ProfBook User Guide 💡
Welcome to ProfBook, a specialised student management system exclusively tailored for CS2103T tutors by CS2103T students. This guide is your gateway to unlocking the potential of ProfBook, where you will discover how ProfBook can help streamline your administrative tasks, alleviate workload and most importantly reduce any administrative errors.
What can ProfBook do 🙋
As current students of CS2103T, we understand that CS2103T tutors have a high administrative workload on top of their existing tutor duties. On top of that, any administrative mistakes or oversights can increase that workload exponentially and may adversely impact students' learning. We deeply appreciate your role, and it is precisely to address these aforementioned issues that we designed ProfBook. ProfBook aims to drastically decrease administrative mistakes and your workload.
ProfBook is optimized for tutors' use via a familiar Command Line Interface (CLI) that uses Linux-styled commands while retaining the benefits of a Graphical User Interface (GUI). If you are a fast typer, ProfBook will empower you to efficiently track and manage students' progress and tasks, surpassing the capabilities of traditional GUI apps with a gentle learning curve.
Features overview
Consolidated Information
As a project-based module, CS2103T tutors have to juggle multiple groups. ProfBook aims to expedite this process by allowing you to keep track of all your groups and their progress within a centralised location. You would be able to traverse between the different groups quickly through familiar Linux commands.
Student and Group Management
ProfBook aids with the management of student and group information. ProfBook efficiently encapsulates information of every project group so that you can easily monitor their progress and relevant information. You can effortlessly add, delete and edit students or groups and even move students from one group to another.
Task Management
In addition to the efficient management of student and group information, ProfBook also aids with the management of task information. You can quickly and seamlessly allocate tasks to specific student or group and track their progress. With ProfBook, you can easily monitor each stage of the task journey, from start to finish, ensuring optimal productivity.
Table of Contents
Quick start
The following steps are similar for all operating systems(OS) such as Windows, macOS and Linux.
Ensure you have Java
11or above installed in your computer.Download the latest
ProfBook.jarfrom here.Copy the file to the folder you want to use as the home folder for your ProfBook.
Open a command terminal,
cdinto the folder you put the jar file in, and use thejava -jar ProfBook.jarcommand to run the application.
A GUI similar to the below should appear in a few seconds. Note how the app contains some sample data.Type the command in the command box and press Enter to execute it.
Some example commands you can try:cat grp-001: Lists all tasks belonging to grp-001.touch grp-001/0123Y --name Bob: Adds a student namedBobto the grp-001.rm grp-001: Deletes grp-001.
Refer to the General Commands, Student or Group Commands, Tasks Commands below for details of each command.
How to use the User Guide 😍
We understand that it may be daunting to delve into a completely new user guide. This section is designed to make this journey more smooth sailing for you and enhance your understanding of the commonly used icons and boxes. We hope you enjoy your reading experience! 😊 📖
Light blue boxes like this with an "i" icon are designated for information-related content.
Keep a look-out for green boxes like this with a light bulb icon, they provide valuable suggestions on how you can better make use of the commands for greater efficiency and convenience once you have mastered the basics of the command.
When you come across yellow boxes like this with a "!" icon, do take extra note and caution!
It contains crucial cautionary information that is definitely a must read.
This is utilized to indicate the output if command succeeds.🙆
This is utilized to indicate the output if command fails.🙅
- Please note that only the relevant outputs for the command are indicated. There may be additional outputs in the case of command failure that are not indicated.
- For more information and solutions on commonly made mistakes, feel free to click here!
Understanding ProfBook 📚
ProfBook Folder Structure
ProfBook is organized hierarchically with the following structure:
Root Directory (e.g., ~/)
The Root Directory serves as the main container for the ProfBook software. This is where all the data is organized.
Group Directories (e.g., grp-001, grp-002, ...)
Within the Root Directory, there are Group Directories only. Each Group Directory is dedicated to managing a specific group of students.
Student Directories (e.g., 1001Z, 5815Y, ...)
Inside each Group Directory, you'll find Student Directories only. These directories represent individual students
within each group.
This hierarchical structure enables a well-organized and efficient way to manage groups and students within ProfBook.
ProfBook Command Format
- Words in
UPPER_CASEare the compulsory parameters to be supplied by you.- e.g. In
touch SPECIFIED_PATH -n NAME,SPECIFIED_PATHand the other field inUPPER_CASEcan be substituted with the desired details to formtouch 2000Y --name Bob.
- e.g. In
- Words in
UPPER_CASEthat are surrounded by[square brackets]are optional parameters to be supplied by you.- e.g. In
cat [SPECIFIED_PATH],[SPECIFIED_PATH]can be substituted with details or left empty,cat 2000Yandcatare acceptable commands.
- e.g. In
- Parameters can be in any order.
- e.g. If the command specifies
-n NAME -e EMAIL,-e EMAIL -n NAMEis also acceptable.
- e.g. If the command specifies
- Extraneous parameters for commands that do not take in parameters (such as
help,exitandclear) will be ignored.- e.g. If the command specifies
help 123, it will be interpreted ashelp.
- e.g. If the command specifies
- Regarding the detection of duplicates,
- For students and groups, duplicates can only be detected if they share the same StudentId or GroupId respectively across ProfBook.
- For Todo tasks, duplicates can only be detected if the todo tasks share the same
description (
DESCRIPTION). - For Deadline tasks, duplicates can only be detected if the deadline tasks share the same
description (
DESCRIPTION) and due date (DATE_AND_TIME).
- If you would like to pass in a field that starts with
\,-or--, you would need to use\before the start of that field.- Else, fields that start with
-or--will be treated as flags and fields that start with\will be treated without\(\Orchardwhen inputted will be treated asOrchard).- e.g. To pass in
-Clementiin theeditcommand, the command would beedit -a \-Clementi.
- e.g. To pass in
- Else, fields that start with
If you are using a PDF version of this document, please be careful when copying and pasting commands that span multiple lines as space characters surrounding line-breaks may be omitted when copied over to the application.
Flags 🚩🚩🚩
All flags begin with -- or -.
Flags usually come before essential details required by the command and are compatible in both long and short forms:
--name/-nfollowed by the name of student or group as specified by command.
--email/-efollowed by the email of student.
--phone/-pfollowed by the phone number of student.
--address/-afollowed by the address of student.
--id/-ifollowed by aSTUDENT_IDorGROUP_IDas specified by the command.
--desc/-dfollowed by the description of task specified by command.
--datetime/-dtfollowed by the due date of a deadline task in theyyyy-MM-dd HH:mmformat.
--all/-alfollowed by either:allStuwhich adds individual tasks to all students within the specified directory.- Can only be used at a group or root directory.
- If used at group directory, task will be added to all students in that group.
- If used at root directory, task will be added to all students in ProfBook.
- Can only be used at a group or root directory.
allGrpwhich adds group tasks to all groups within the root directory.- Can only be used at root directory.
--help/-h- Use with any command (except
exit,helpandclear) for more information. - e.g.
touch --helpto learn more about how to add a student to ProfBook.
- Use with any command (except
Acceptable values for each parameter
SPECIFIED_PATH:
- Must be a valid path.
- Most commands will require the
SPECIFIED_PATHto be a present path (path that currently exists within ProfBook) except for thetouchandmkdircommands.
| Symbol | Purpose of symbol |
|---|---|
.. | Step up one level from the current directory. e.g. when executing cd .. at the group directory, you will move up to the root directory. |
. | Stays as current directory. |
/ | Between every type of directory (Root, Group and Student), it will be separated by /. This format ensures a clear and consistent representation, which aligns with the familiar Linux command. |
~ | Represents the root directory. |
To begin writing a valid path, start with the directory you can and intend to navigate. Alternatively, you can always
commence from the root directory, ~/, and define your path as the route leading from the root directory to your desired directory.
Kindly note that direct navigation between directories of the same type is not permitted.
You would need to navigate up by at least one directory before moving to the desired directory.
e.g. use ../grp-001 to navigate up to the root directory first before navigating to the grp-001 group directory
from another group directory.
Additionally, skipping directories between other directories is not allowed. For instance, to navigate from the root directory
to a student directory, 0123Y, where the student directory is within group directory, grp-001,
you would need to utilize ~/grp-001/0123Y and not ~/0123Y.
NAME:
- Must be a non-empty string that only contain alphanumeric characters and spaces.
- This means that you cannot input a blank field.
EMAIL:
- Must be a non-empty string following the format of
local-part@domain.local-part:- Should only contain alphanumeric characters and special characters,
+_.-. - May not start or end with any special characters.
- Should only contain alphanumeric characters and special characters,
domain:- Made up of domain labels separated by periods.
- Domain labels:
- At least 2 characters long.
- Consist of alphanumeric characters, separated only by hyphens, if any.
- Must end with alphanumeric characters.
PHONE_NUMBER:
- Must be a non-empty string of numbers of at least 3 digits.
ADDRESS:
- Must be a non-empty string, which means you cannot input a blank field.
STUDENT_ID:
- Must follow the format of a valid StudentId.
Required format for StudentId:
XXXXawhereXXXXis replaceable with any 4-digit whole number andais replaceable with any alphabet.- Note: StudentId here corresponds to the last 5 place of an NUS student's matriculation number and is not a StudentId created by you. This format helps you to identify students easily while maintaining privacy and security.
- eg.
8467U
GROUP_ID:
- Must follow the format of a valid GroupId.
Required format for GroupId:
grp-XXXwhereXXXis replaceable with any 3-digit whole number.- Note: GroupId is case-insensitive, meaning
GrP-001andGrp-002are also acceptable.
- eg.
grp-001
- Note: GroupId is case-insensitive, meaning
DESCRIPTION:
- Must be a non-empty string, which means you cannot input a blank field.
DATE_AND_TIME:
- Must be in the format
yyyy-MM-dd HH:mmwhere each alphabet will be replaced by a positive whole number.yyyy: year.MM: month.dd: day.HH: hour (24-hour format).mm: minutes.
- e.g. 2023-10-01 23:59
TASK_INDEX:
- Must be a positive whole number, which means it cannot contain decimals or fractions.
- Must fall within the range of 1 and the size of the task list of the specified student or group.
Navigating the Graphical User Interface(GUI) 👀
ProfBook's graphical user interface(GUI) presents crucial information through visuals. However, please note that ProfBook utilizes a Command Line Interface (CLI) approach, limiting the interactions with the graphical components to mainly scrolling via scrollbars. Let's navigate ProfBook's GUI together in sequential order!
Root Directory
Upon launching ProfBook, you will see the root directory as illustrated below.
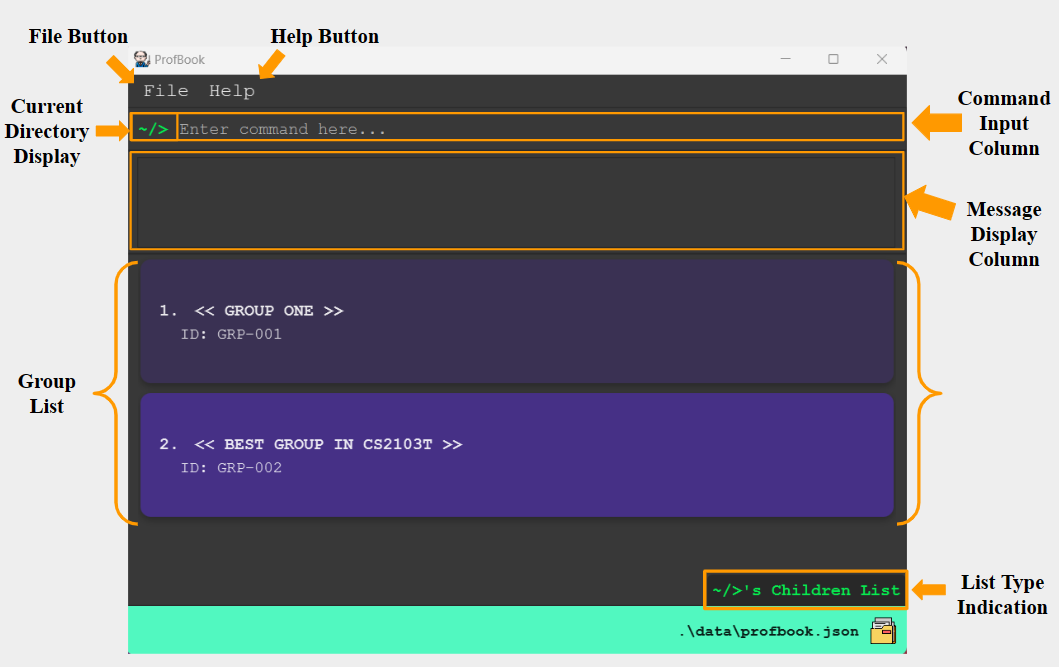
| Component name | Description |
|---|---|
| File Button | Click the File Button to access the Exit Button, allowing you to exit ProfBook. |
| Help Button | Easy access to the User Guide by clicking this button. |
| Current Directory Display | Displays your current directory. In this case, you are in the root directory, ~/. |
| Command Input Column | This area is for inputting commands. This will likely be the component you will be using most frequently. |
| Message Display Column | Displays the output of the command result. Please take note of it especially when a command fails. |
| Group List | Shows the groups within the root directory. |
| List Type Indication | Indicates the list type of the current display you are viewing, either a Children List or Task List. In this instance, it shows the Children List of the root directory. |
- Children List: List of Children belonging to current directory.
- If at the root directory, Children List will contain groups.
- If at a group directory, Children List will contain students.
Group Directory, grp-001
When you navigate to the group directory, grp-001, using cd grp-001, your interface should resemble
the following.
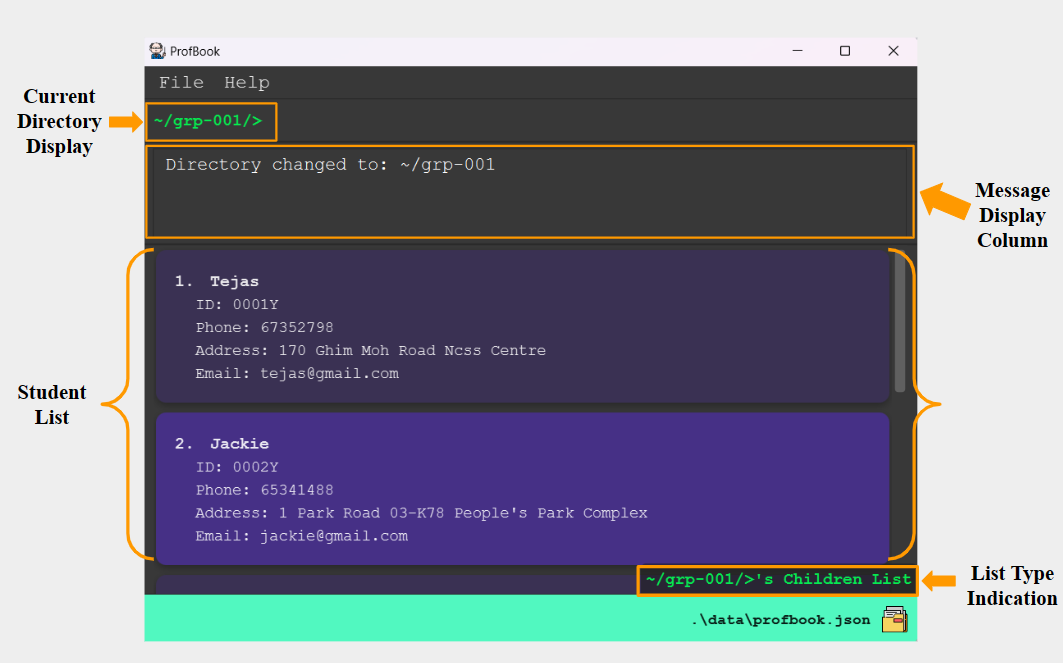
| Component name | Description |
|---|---|
| Current Directory Display | Displays your current directory. In this case, you are in the group directory, ~/grp-001. |
| Message Display Column | Displays the output of the command result. Note that it shows that your directory has changed after executing cd command. |
| Student List | Shows the students within current group directory. |
| List Type Indication | Indicates the list type of the current display you are viewing, either a Children List or Task List. In this instance, it shows the Children List of the group directory. |
Task List of Group Directory, grp-001
To view the task list of the current group directory, simply use cat.
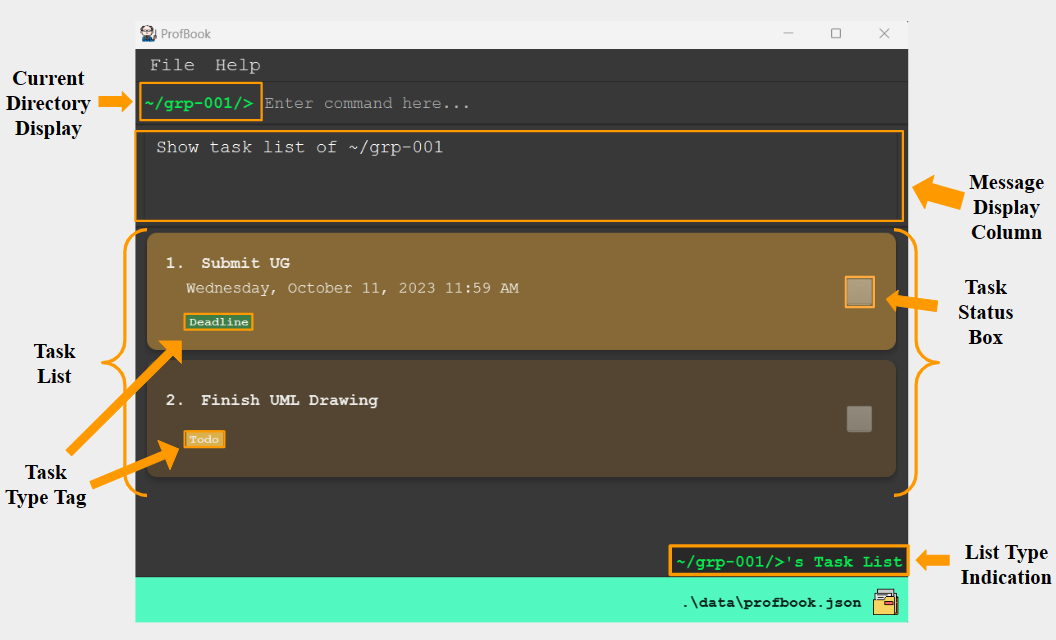
| Component name | Description |
|---|---|
| Current Directory Display | Displays your current directory. In this case, you are in the group directory, ~/grp-001. |
| Message Display Column | Displays the output of the command result. Note that it shows that you are viewing the task list of group directory, ~/grp-001. |
| Task List | Shows the tasks allocated to group at current group directory. |
| Task Type Tag | Shows the task type of the specific task, distinguishing between Todo tasks (highlighted in yellow) and Deadline tasks (highlighted in green). |
| Task Status Box | Indicates completion status of specific task, using a tick for marked task and the absence of a tick for unmarked task. |
| List Type Indication | Indicates the list type of the current display you are viewing, either a Children List or Task List. In this instance, it shows the Task List of the group directory. |
- Task List: List of tasks belonging to specific directory.
- Task List for group directory, shows tasks allocated to this specific group.
- Task List for student directory, shows tasks allocated to this specific student.
General Commands
Change Directory: cd
Changes the current directory in ProfBook.
Format: cd SPECIFIED_PATH
Acceptable values for each parameter:
SPECIFIED_PATH:
- Must be a valid path to a group or root.
Please note that the path entered should not lead back to the current directory you are at.
For example, if you are at ~/grp-001, when you execute cd ../grp-001, the Message Display Column
will indicate that you are already in the directory.
Example(s):
- When you are at the root directory
~/and would like to take a look at the group directory,~/grp-001,cd grp-001changes your directory togrp-001.
- When you are at the directory
~/grp-001and would like to change directory fromgrp-001togrp-002you could use,cd ../grp-002-> use..to navigate up to the root directory before proceeding to thegrp-002directory.
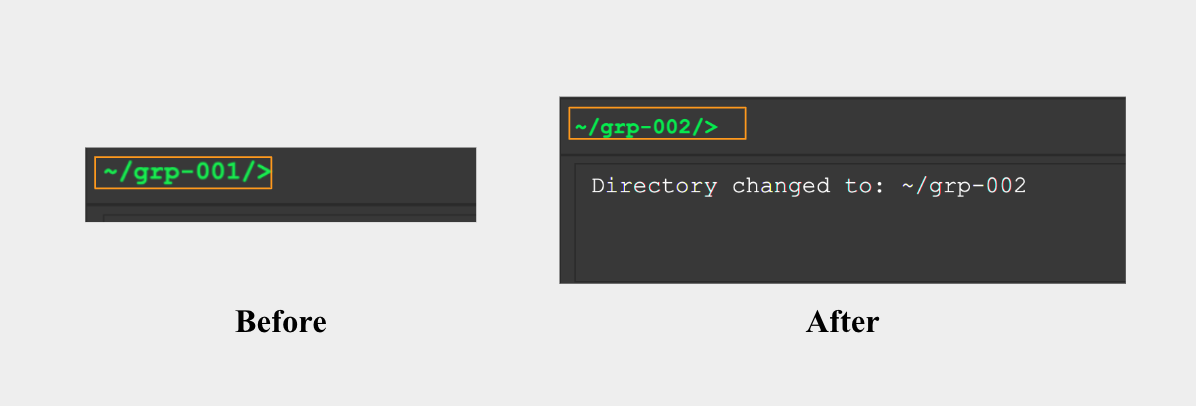
Other than checking the Message Display Column to ensure that the command has been executed successfully,
you could always look at the Current Directory Display in the top left corner of the window.
In the image above, you can easily see that the current directory has been switched from
~/grp-001 to ~/grp-002.
Display Directories : ls
Shows the list of children in the specified directory.
Format: ls [SPECIFIED_PATH]
Acceptable values for each parameter:
[SPECIFIED_PATH]:
- Must be a valid path to a group or root.
If [SPECIFIED_PATH] is not provided, the ls command will show the list of children in the current directory.
Current directory must be a root or group directory.
Example(s):
- When you are at the root directory
~/and would like to see all the groups you have,lswill return all the current groups.
- When you are at the root directory
~/and would like to see the students undergrp-001,ls grp-001will return all the students ingrp-001.
Display all Tasks: cat
Displays all tasks in the specified directory.
Format: cat [SPECIFIED_PATH]
Acceptable values for parameter:
[SPECIFIED_PATH]:
- Must be a valid path to a group or student.
- Must not be a path to root.
If [SPECIFIED_PATH] is not provided, current directory must be a group directory.
The cat command will show the list of tasks in the current group directory.
Example(s):
- When you are at the directory
~/grp-001and would like to see all tasks allocated togrp-001,- Executing
catwill return all the tasks allocated togrp-001. - Result shown will be similar to this.
- Executing
If you are at the directory ~/grp-001 and would like take a quick look of the tasks allocated to student with the StudentId 0010Y
(0010Y is within grp-001),
cat 0010Ywill return all the tasks allocated to student with the StudentId0010Y.
View Help : help
Shows a message of the commands you could use.
Format: help
Clear all Entries : clear
Clears all entries from ProfBook.
Format: clear
The clear command, upon confirmation by pressing enter, will clear all entries from ProfBook.
It is crucial to note that there is no way to recover these entries once the clear command has been executed.
Therefore, we strongly advise exercising caution when using this command.
Exit ProfBook : exit
Exits the program.
Format: exit
This command is a time-saver for those who would rather avoid using the mouse to click on the close button positioned in the top-left corner of the window.
Student or Group Commands 👪
Add a Student: touch
Adds a student into the specified group directory.
Kindly note that the addition of students is exclusively to group directories. This means direct addition of students to the root directory is not allowed.
Format: touch SPECIFIED_PATH --name NAME [--email EMAIL] [--phone PHONE_NUMBER] [--address ADDRESS]
Acceptable values for each parameter:
SPECIFIED_PATH:
- Must be a valid path to a student.
- If the command is executed outside the intended group to add the student, the specified path must extend to encompass both the group and the student to ensure accurate execution.
Example(s):
- When you are at the directory
~/grp-001, you could add a new student named Bob with the StudentId0200Yto this group through the following command,touch 0200Y --name Bob
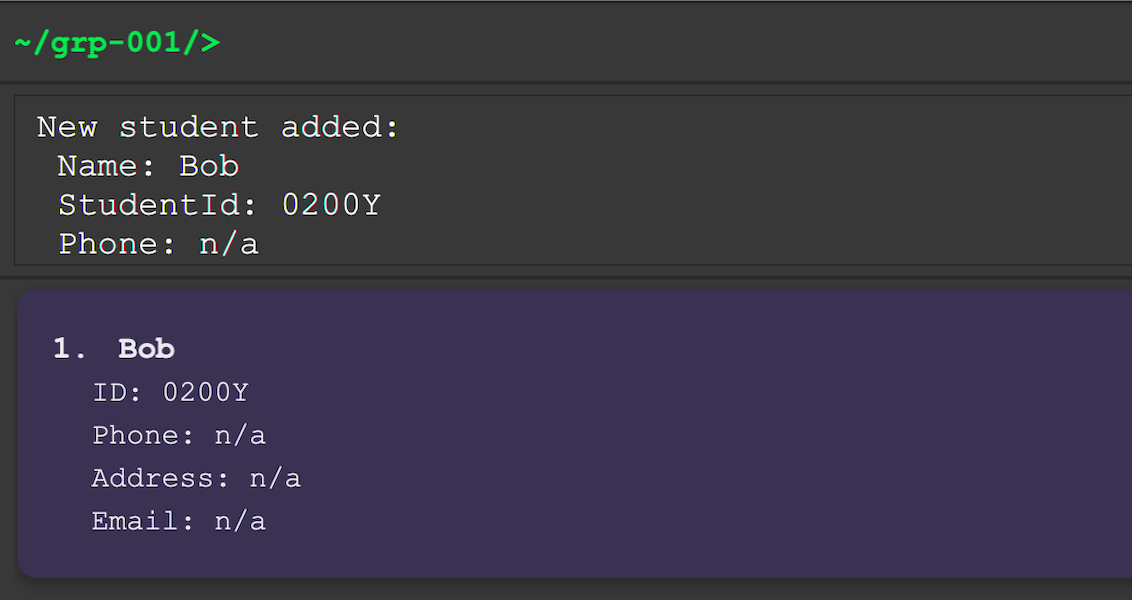 Following the execution of the
 touch command, Bob appears in the Student List. The Message Display Column
also indicates the addition of a new student, Bob.
Observe that all fields for Bob, except for Name and StudentId, are marked n/a as you did
not include them in the initial command. But fear not! You can always add these additional fields through
the edit command!
When you are at the group directory ~/grp-001 and would like to add the same student, to another directory
~/grp-002 instead,
- You could use
touch ../grp-002/0200Y --name Bobto save yourself the trouble from having to change directory before executing thetouchcommand!
Create a Group : mkdir
Creates a group in the root directory that can contain students.
Kindly note that the addition of groups is exclusively to the root directory. This means that addition of groups under another group directory is not allowed.
Format: mkdir SPECIFIED_PATH_TO_GROUP --name NAME
Acceptable values for each parameter:
SPECIFIED_PATH_TO_GROUP:
- Must be a valid path to a group.
Example(s):
- When you are at the root directory
~/and would like to add a new group with the GroupId
grp-001,mkdir grp-001 --name Group 001will add that group namedGroup 001.
Edit a Student: edit
The edit command uses the same command word, edit, for both editing students and groups.
For greater clarity, we have separated the sections for editing a student and group.
If you wish to edit a group instead, please refer to the dedicated section here.
Edits a student's details including name, email, phone, address or StudentId in the specified path.
One or more fields can be edited in a single command.
Format: edit SPECIFIED_PATH [--name NAME] [--email EMAIL] [--phone PHONE_NUMBER] [--address ADDRESS] [--id STUDENT_ID]
Acceptable values for each parameter:
SPECIFIED_PATH:
- Must be a valid path to a student.
Example(s):
- If a student in
grp-001with the StudentId0010Ychanged his phone number, you could execute the following command at the directory~/grp-001, to make the necessary changes.edit 0010Y --phone 91919191
When you are at the root directory ~/ and would like to edit the same student's phone number,
- You could use the command
edit ~/grp-001/0010Y --phone 91919191to save yourself the trouble from having to change directory before executing theeditcommand!
Edit a Group: edit
The edit command uses the same command word, edit, for both editing students and groups.
For greater clarity, we have separated the sections for editing a student and group.
If you wish to edit a student instead, please refer to the dedicated section here.
Edits a group's details including name or GroupId in the specified path.
One or more fields can be edited in a single command.
Format: edit [SPECIFIED_PATH] [--name NAME] [--id GROUP_ID]
Acceptable values for each parameter:
[SPECIFIED_PATH]:
- Must be a valid path to a group.
If [SPECIFIED_PATH] is not provided, current directory must be a group directory.
The edit command will edit the group at current directory.
Note: Changes to group name will only be visible after you have cd out of current group directory
to root directory.
Example(s):
- If
grp-001changed their group name, you could execute the following command at the directory~/grp-001, to make the necessary changes.edit --name Amazing Group1
When you are at the root directory ~/ and would like to edit the same group's name,
- You could use
edit ~/grp-001 --name Amazing Group1to save yourself the trouble from having to change directory before executing theeditcommand!
Delete a Student or Group: rm
Removes a student or group from the specified path.
Format: rm SPECIFIED_PATH
Acceptable values for each parameter:
SPECIFIED_PATH:
- Must be a valid path to a student or group that you would like to remove.
Example(s):
- When you are at the root directory
~/and would like to remove the group with the GroupIdgrp-001,rm grp-001will do that!
When you are at the root directory ~/ and would like to remove the student with the StudentId 0123Y,
in ~/grp-001,
- You could use the command
rm ~/grp-001/0123Yto save yourself the hassle of having to change directory!
Move a Student: mv
Moves student from one group to another group.
Format: mv SPECIFIED_PATH_TO_STUDENT SPECIFIED_PATH_TO_GROUP
Acceptable values for each parameter:
SPECIFIED_PATH_TO_STUDENT:
- Must be a valid path to a student that you would like to move.
SPECIFIED_PATH_TO_GROUP:
- Must be a valid path to a group that you would like to move the student to.
Example(s):
- In the beginning of the semester, student transfers amongst groups are common. When you are at the root directory
~/, you could move a student with the StudentId0123Y, fromgrp-001togrp-002through this command easily,mv grp-001/0123Y grp-002
When you are at the directory ~/grp-001 and would like to move a student with the StudentId 0123Y to grp-002 without changing to the
root directory,
- You could use the command
mv 0123Y ../grp-002!
Tasks command 📋
Student Tasks are tasks assigned to individual students. These tasks are ideal for assignments where each student is required to complete and submit their assignment independently.
Group Tasks on the other hand are tasks designated for a specific group as a collective responsibility, not individual students within the group. They are suitable for tasks that require group collaboration instead of individual student contributions.
Tasks are only allocated to groups or students. This means that tasks cannot be allocated to the root directory.
Create Todo Task : todo
Creates todo tasks for specific student(s) or group(s).
Format: todo [SPECIFIED_PATH] --desc DESCRIPTION [--all CATEGORY]
Acceptable values for each parameter:
[SPECIFIED_PATH]:
- Must be a valid path to a student or group.
If [SPECIFIED_PATH] is not provided, current directory must be a group directory.
If you use --all allStu, the command will create todo tasks for all the students within this group directory.
Else, the command will create a todo task for the group at current directory.
Example(s):
- When a specific student with the StudentId
0010Yhas to redo his tutorial, you could use the following command when you are in the directory~/grp-001to allocate the task to just this student,todo 0001Y --desc Redo tutorial
When you have an assignment, Assignment 1 to be allocated to all your students in grp-001, you could use the
following command at the root directory, ~/,
todo ~/grp-001 --desc Assignment 1 --all allStu
Create Deadline Task : deadline
Creates task with a deadline for specific student(s) or group(s).
Format: deadline [SPECIFIED_PATH] --desc DESCRIPTION --datetime DATE_AND_TIME [--all CATEGORY]
Acceptable values for each parameter:
[SPECIFIED_PATH]:
- Must be a valid path to a student or group.
If [SPECIFIED_PATH] is not provided, current directory must be a group directory.
If you use --all allStu, the command will create deadline tasks for all the students within this group directory.
Else, the command will create a deadline task for the group at current directory.
DATE_AND_TIME accepts past deadlines. Hence, you can also utilize the deadline command
to keep track of past events without worry!
Example(s):
- When a specific student with the StudentId
0010Yhas to hand in his assignment again by a certain date, you could use the following command when you are in the directory~/grp-001,deadline 0001Y --desc resubmit Assignment 1 --datetime 2023-10-11 23:59
When you have a task, Project 1 submission with a deadline to be allocated to all your groups,
you could use the following command at the root directory, ~/,
deadline --desc Project 1 submission --datetime 2023-10-11 23:59 --all allGrp
Mark Task as Completed: mark
Marks the specified task as done for the specified student or group.
Format: mark TASK_INDEX
When using this command, you will first need to cat at the path where the task list is at before executing mark.
Example(s):
- When you find yourself in the
~/grp-001directory and wish to mark the completion of the first task allocated to student with the StudentId0123Y, you could follow these commands in sequential order.cat 0123Ymark 1
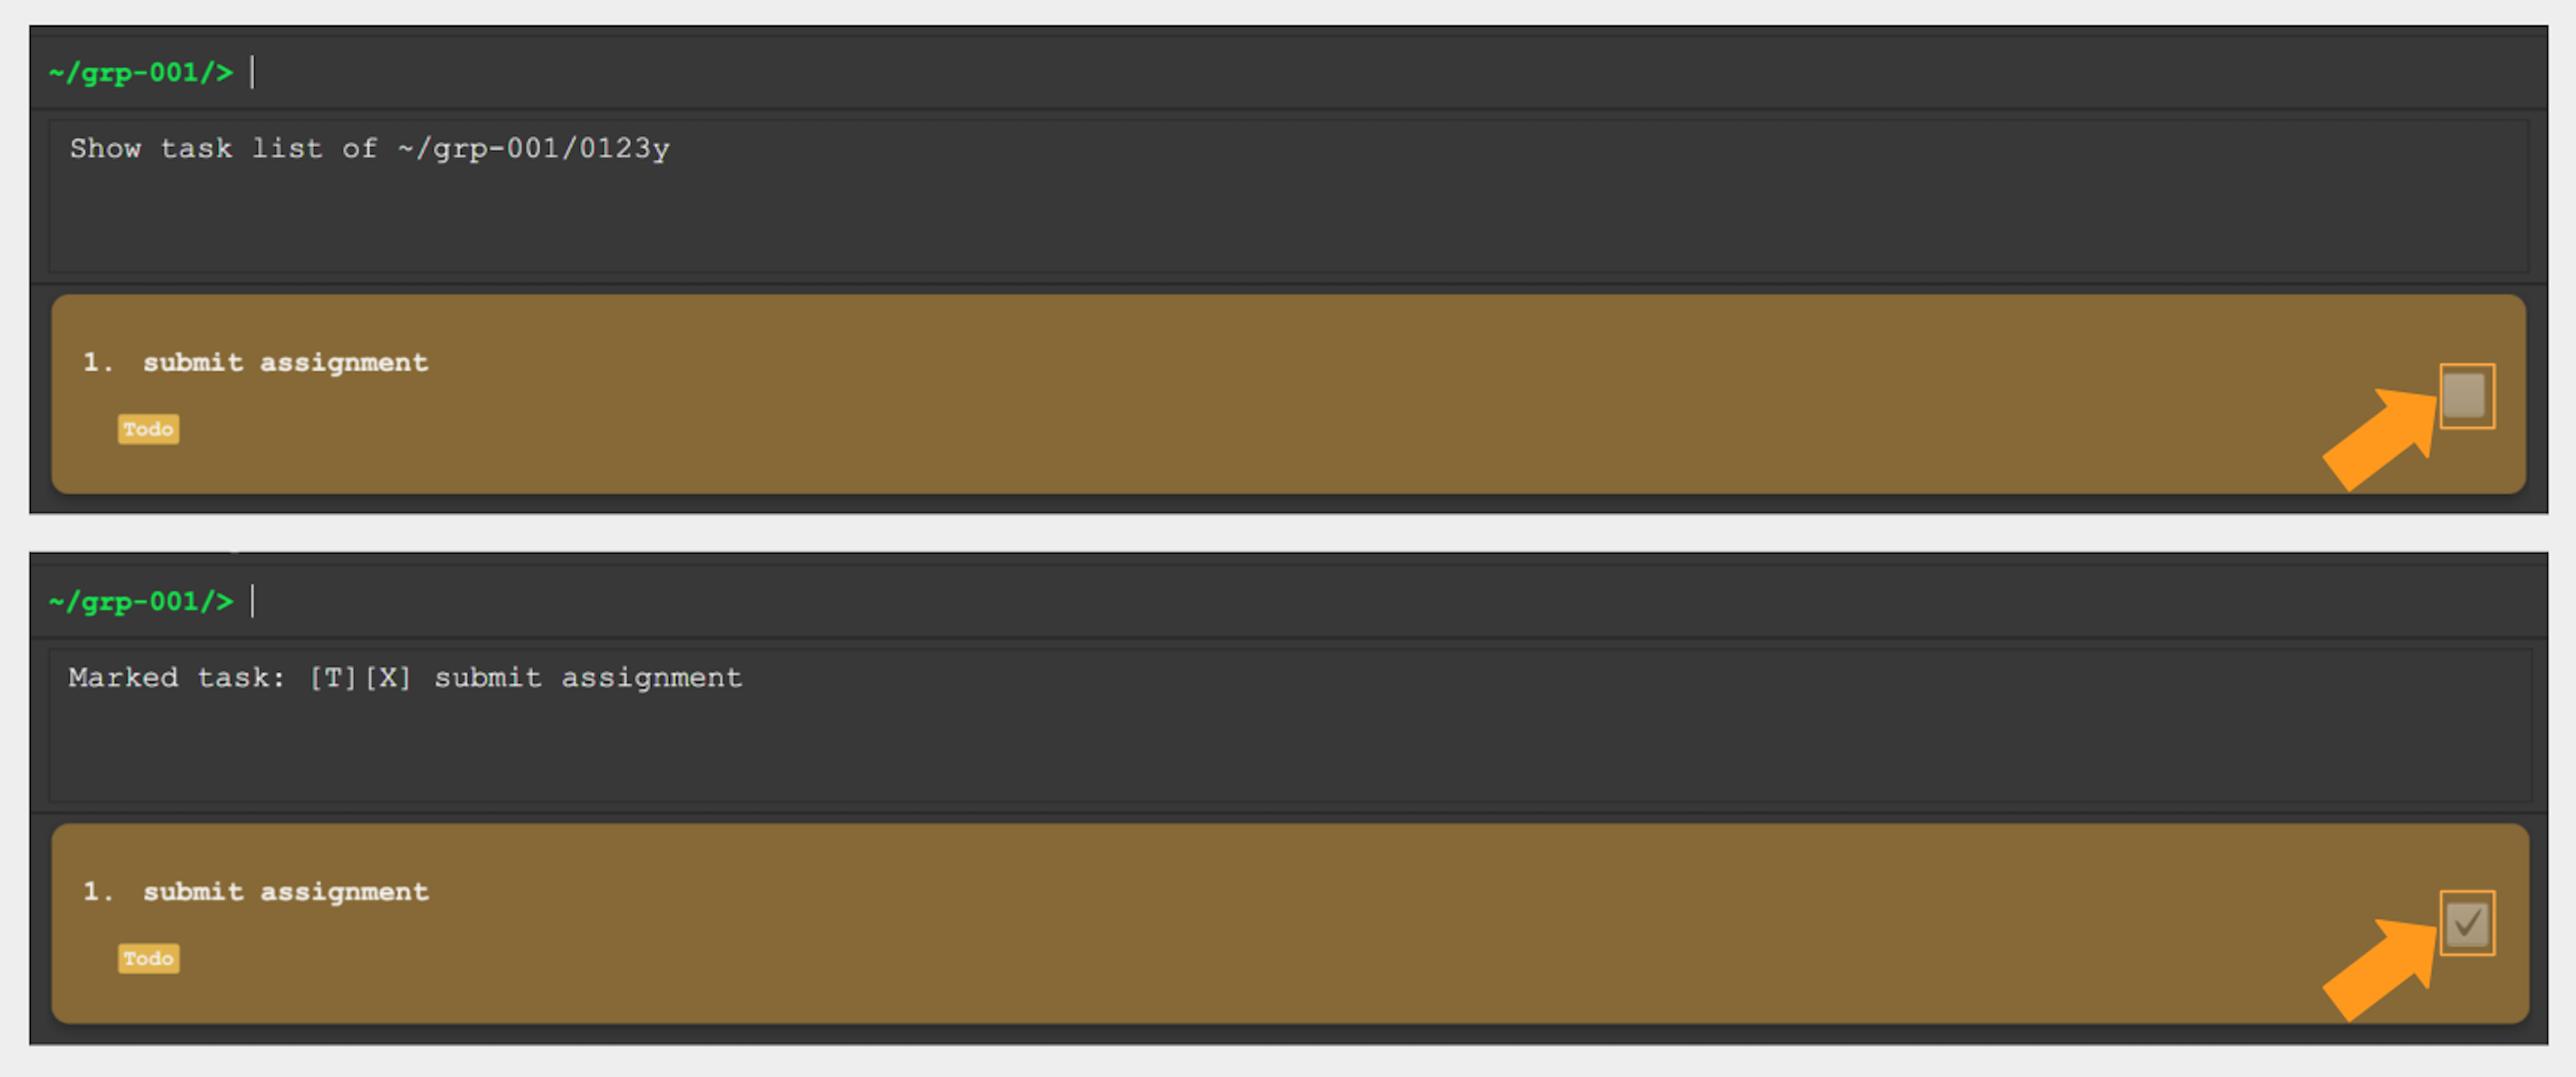 Did you observe the difference in the Task Status Box between the 2 pictures?
The first image shows the outcome when you execute cat 0123Y, whereas the second image shows
the outcome of the execution of mark 1.
Notice the presence of a tick in the Task Status Box of the second image,
after you mark the task.
Unmark Task: unmark
Unmarks the specified task for the student or group.
Format: unmark TASK_INDEX
When using this command, you will first need to cat at the path where the task list is at before executing unmark.
Example(s):
- When you are at the
~/grp-001directory and would like to unmark the first task allocated to this group, you could follow these commands in sequential order.catunmark 1
The process and result shown should be similar to the mark command except that
instead of noticing the presence of a tick in the Task Status Box,
you should observe an absence of the tick after executing the unmark command.
Delete Task: rmt
Removes a task according to the task index.
Format: rmt TASK_INDEX
When using this command, you will first need to cat at the path where the task list
is at before executing rmt.
Example(s):
- When you are at the
~/grp-001directory and no longer want to keep track of the first task allocated to student with the StudentId0123Y, you could always remove this task by following these commands in sequential order.cat 0123Yrmt 1
Save the data
ProfBook data are saved in the hard disk automatically after any command that changes the data. There is no need to save manually.
Commonly made mistakes
As Albert Einstein wisely said, "A person who never made a mistake never tried anything new".
At ProfBook, we wholeheartedly believe that mistakes are part of the learning journey. We are here to support you in your quest of mastering ProfBook, helping you recover from any hiccups that may happen along the way. As such, we have collated a list of some commonly made mistakes and solutions to them. 💪
Mistake 1: Invalid command format
Some possible errors from invalid command format are,
- Excessive or duplicate arguments.
- This occurs when there are duplicate flags or an excess of compulsory or optional parameters as outlined in the command format.
- Missing arguments.
- This issue arises when there are missing compulsory parameters from the command you entered.
- Invalid option.
- Solution:
- Pay close attention to the invalid option (also known as flags) indicated in the return message.
- First, ensure that the option is applicable for the command you are utilising.
- Second, confirm that there are no misspellings especially when it comes to options in their long forms. By adhering to these steps, you could efficiently correct invalid options in your commands.
- Solution:
Please note that if there are multiple invalid options, only the first invalid option will be shown in the return
message.
This approach aids you to concentrate on addressing the current invalid option before moving on to the subsequent
ones. The next invalid option will be shown after rerunning the command if the current invalid option has been solved.
General solution: Ensure that the command you enter adheres to the format provided in the user guide.
Mistake 2: Invalid path
Solution: Please check that the path you entered is the path required by the command which can be seen in the User Guide. Additionally, do ensure that it is the intended path you wish to utilise, and it exists within ProfBook.
Mistake 3: Invalid task index
Solution: Task index starts from 1. Check that the index you input is a positive whole number and falls within the range of 1 to the total number of tasks in the task list.
Mistake 4: The display panel is not showing task list
Solution:
Please do not forget to execute the cat command prior to executing the required command.
Mistake 5: At least one field to edit must be provided
Solution:
If editing a student, ensure that you have indicated at least one field
(NAME, EMAIL, PHONE_NUMBER, ADDRESS or STUDENT_ID) to edit and that the flag used is accurate.
If editing a group, ensure that you have indicated at least one field (NAME or GROUP_ID)
to edit and that the flag used is accurate.
Mistake 6: Value(s) provided is the same as the current value(s). No changes have been made.
Solution: When modifying information for a student or group, please ensure that at least one field you intend to edit differs from the current parameters associated with the student or group.
Mistake 7: Duplicate Id.
Solution: Ensure that the GroupId or StudentId you entered does not coincide with other GroupId or StudentId respectively in the whole ProfBook.
FAQ
Q: How do I transfer my data to another computer?
A: Install ProfBook in the other computer and overwrite the empty data file it creates with the file that contains
the data of your previous ProfBook home folder.
Q: Is there an edit command for tasks?
A: Currently, we do not have an edit command for tasks. But we would love to have it in ProfBook and
are definitely working toward including it in our future enhancements.
Known issues
Do note that if you decide to edit the data file manually, any invalid edits may cause the presence of duplicates or cause ProfBook to start with an empty file. So, do proceed with caution!
- When using multiple screens, if you move the application to a secondary screen, and later switch to using only
the primary screen, the GUI will open off-screen. The remedy is to delete the
preferences.jsonfile created by the application before running the application again.
Exciting future developments 👀
This section is dedicated to the exciting future enhancements we envision for ProfBook.
Viewing edited group name at current group directory:
- Current: To view changes to the group name, you would need to
cdout of the current group directory to the root directory, similar to terminal behaviour. - Upcoming enhancement: ProfBook will return a more informative message that clearly indicates the updated group name after execution of command.
Marking and Unmarking tasks:
- Current: You can mark and unmark tasks that are already marked or unmarked respectively.
- Upcoming enhancement: ProfBook will return a return message confirming that the task has already been marked or unmarked, and the current command will not result in any changes.
Editing tasks:
- Current: ProfBook does not have an
editcommand for tasks. But you could alwaysrmtthe task and add it back through thetodoordeadlinecommand! - Upcoming enhancement: We are actively developing the
editcommand for tasks, mirroring theeditcommand for students and groups. This addition will simplify the learning process of this new command, ensuring a seamless experience for you.
Command summary
| Action | Format, Example(s) |
|---|---|
| Change Directory | cd SPECIFIED_PATH e.g. cd ../grp-001 |
| Display Children List | ls [SPECIFIED_PATH] e.g. ls grp-001 |
| Display Task List | cat [SPECIFIED_PATH]e.g. cat 1234A, cat grp-001 |
| Help | help |
| Clear all entries | clear |
| Exit the program | exit |
| Add Student | touch SPECIFIED_PATH -n NAME [-e EMAIL] [-p PHONE_NUMBER] [-a ADDRESS] e.g. touch 2000Y -n Bob -e bobby@example.com -p 92929292 -a blk 258 Toa Payoh |
| Create Group | mkdir SPECIFIED_PATH_TO_GROUP -n NAME e.g. mkdir grp-001 -n Group 001 |
| Edit Student | edit SPECIFIED_PATH [-n NAME] [-e EMAIL] [-p PHONE_NUMBER] [-a ADDRESS] [-i STUDENT_ID] e.g. edit 0010Y -p 91919191 |
| Edit Group | edit [SPECIFIED_PATH] [-n NAME] [-i GROUP_ID] e.g. edit -n Amazing Group |
| Delete Student or Group | rm SPECIFIED_PATH e.g rm 0123Y, rm grp-002 |
| Move Student | mv SPECIFIED_PATH_TO_STUDENT SPECIFIED_PATH_TO_GROUP e.g. mv grp-001/0123Y grp-002 |
| Create Todo | todo [SPECIFIED_PATH] -d DESCRIPTION [-al CATEGORY] e.g. todo 2000Y -d Assignment 1 |
| Create Deadline | deadline [SPECIFIED_PATH] -d DESCRIPTION -dt DATE_AND_TIME [-al CATEGORY]e.g. deadline 2000Y -d Assignment 1 -dt 2023-10-11 23:59 |
| Mark | mark TASK_INDEXe.g. mark 1 |
| Unmark | unmark TASK_INDEXe.g. unmark 2 |
| Delete Task | rmt TASK_INDEXe.g. rmt 1 |
